Imperva Cyber Community

 View Only

Configuring a Scan for Sensitive Data with Imperva DAM

By Craig Burlingame posted 11-12-2020 08:18

  
Pic found here: https://unsplash.com/photos/LqKhnDzSF-8 

Introduction to Sensitive Data Scanning

Many organizations lack visibility into the sensitive data in their possession.  This lack of visibility creates a number of different risks because unprotected data may be exposed to a data breach. Or, a failure to restrict access to sensitive data could place an organization in breach of data protection regulations.

Imperva DAM provides the ability to rapidly and automatically scan an organization’s database for a wide range of sensitive data (including custom, user-defined types).  Configuring a scan for sensitive data not only provides visibility into an organization’s stores of this data but also lays the groundwork for implementing audit and security policies in Imperva DAM.

Configuring a Scan

Configuring a scan requires defining the types of sensitive data to look for and setting other parameters for the scan (such as when it should be run).  The settings for configuring Scans are located under the Discovery and Classification, the leftmost option in the top ribbon in the console.
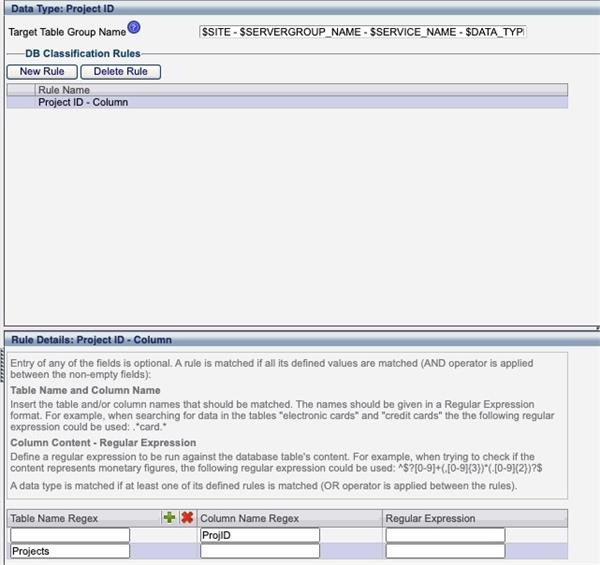
Defining Data Types

The first step in defining a scan is identifying the types of data that the scan should be able to look for.  Under the Scans Management tab in the blue ribbon should be a drop-down menu labeled Scope Selection.  In this menu, select Data Types Configuration.


The left side of the resulting screen will be labeled Scan-related Objects Tree.  This tree contains a list of the various types of sensitive data that can be included within a scan.

By default, Imperva includes definitions for some of the most common types of sensitive data.  For example, as shown in the image above, Imperva can automatically search for credit card information, email addresses, phone numbers, and ZIP codes.

However, it is possible that an organization has certain types of sensitive data that do not match the predefined filters.  For example, a company may wish to label any references to an internal R&D project as sensitive so that it can monitor and manage access to associated data.  

Alternatively, an organization may have ID numbers for customers or employees that do not match the standard formats.

In these or any other cases, it is possible to define custom data types to match these new types of sensitive data.  Before moving on to the next step, create any new data types here.

Creating a Scan Profile

To create a scan profile, select the Scan Profiles option from the Scope Selection drop-down menu under Scan Management.  This will open a window with two tabs.


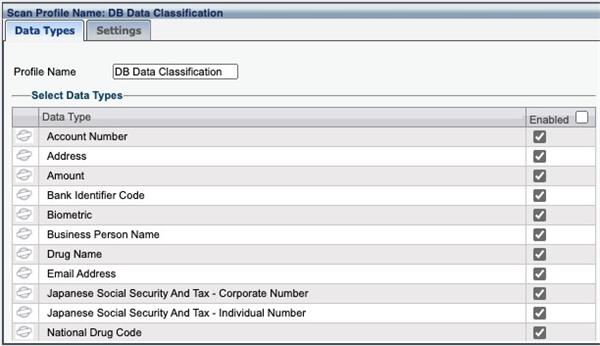
The left tab is labeled Data Types and is shown above.  In this tab, the types of data to be included in the scan can be defined based upon the Data Types defined previously.  To remove a particular data type from the scan, uncheck the box in its row.


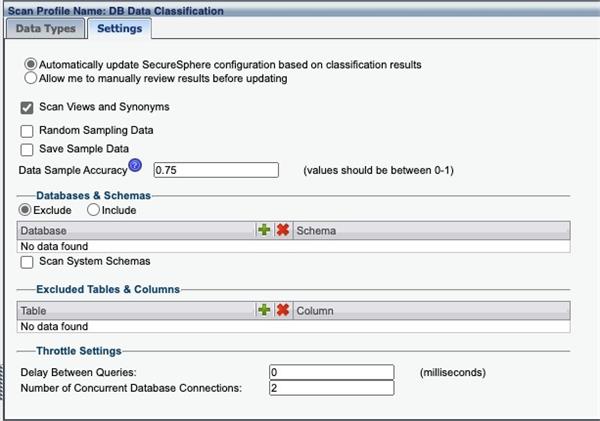
The Settings tab (shown above) provides more configuration options for the Scan Profile.  One value of interest here is the Data Sample Accuracy.  This value can be set in the range 0-1 and allows users to balance the false positive and false negative rates of a potential scan.

Creating the Scan

After defining a scan profile, it is time to create the scan itself.  In the same drop-down menu as previously, select the Scan option.

The window opened has a number of different tabs:

  • Settings:
          In the Settings tab, select the previously defined Scan Profile that describes the types of sensitive data to be searched for during the scan. 

  • Apply To: The Apply To tab defines where the scan should be performed.  This can include the entirety of a site tree or a subset of it.

  • Scheduling: This tab allows you to execute a scan or to define when the scan should be performed in the future.  The scheduling feature ensures that Imperva DAM is kept updated as new sensitive information is added to the database.

    History: This shows a list of the current and previous runs of this scan and their status.

Viewing Sensitive Data

If a scan is run now, it may take some time for the scan to be complete.  By monitoring the History tab, it is possible to track the current status of the scan.  Once a scan has been completed, the results can be viewed by clicking on the Classified DB Data tab in the Blue ribbon towards the top of the screen.


The table shown contains a great deal of information about the sensitive data discovered using the scan.  This includes the type of data detected (labeled based upon the Data Types defined above), the database and table where they are located, the scan that found the sensitive data, and other information.

Next Steps for Sensitive Data Management

Imperva DAM’s sensitive data scans provide a rapid and user-friendly method to discover sensitive data within an organization’s systems.  By defining a site tree and defining and running a scan against this site tree, the user can discover if databases contain a particular type of sensitive data or any sensitive data at all.

However, while discovering this data is useful, it is only the first step in the data management process.  Once sensitive data has been discovered within an organization’s systems and is visible to Imperva DAM, it is possible to define audit and security policies to log and restrict access to this sensitive data.

Watch the webinar on Operational Best Practices for a Successful Data Activity Monitoring Deployment 


Related Content: 
6 Steps to Deploying Imperva DAM
Resource Bundle Imperva Database Activity Monitoring Q&A
Resource Bundle: Imperva DAM Deployment Best Practices


#DatabaseActivityMonitoring
2 comments
473 views

Permalink

Comments

02-02-2024 02:25

@Craig Burlingame - Can you comment any best practice processes or steps for scanning 400+ databases, or for scanning databases with 10,000 tables, etc...?  How do you recommend working through and managing that process from a workload perspective on the staff and the resource load/utilization of the databases themselves?  Thanks!!

01-13-2021 05:12

thank you