This document will provide the necessary steps to enable logging of Imperva WAF Gateway Security Alerts to the Azure Sentinel solution.
Create the Action Interface
The first step of the process is to define a new Action Interface. This is accomplished by navigating to Admin -> System Definitions –> Action Interfaces.
1. Create a new action interface by clicking the red plus sign on the middle of the screen.
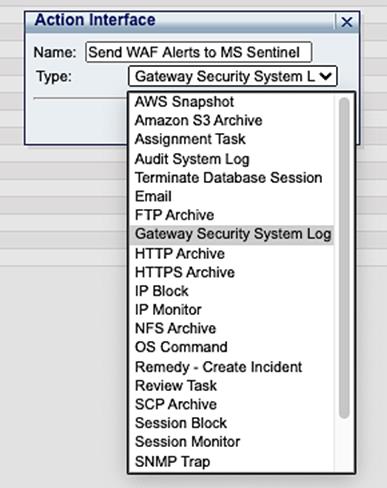 Name it something that will make it easy to understand what it is for and select “Gateway Security System Log from the pull-down menu.
2. Now expand your newly created action interface and uncheck the boxes next to the protocol, primary host and port, Syslog Log level, Message, and Facility options
a. Protocol can be TCP or UDP, matched to the Azure Sentinel service you have created.
b. Primary host can be either the externally accessible IP address, or the fully qualified domain name, of the Azure Sentinel service you have created.
c. Port should match the listening port of the Azure Sentinel service you have created.
d. Syslog Log level can be anything you choose. The default is “INFO”.
e. The message is the full message format you wish to send to the Azure Sentinel service you have created. This is the default string to use:
CEF:0|Imperva Inc.|WAF Gateway|${SecureSphereVersion}|${Event.violations.alert.alertType}|#cefEscapeMessage(${Violation.PolicyName})|${Event.violations.alert.severity}|act=${Event.violations.alert.immediateAction} dst=${Event.destInfo.serverIp} dpt=${Event.destInfo.serverPort} duser=#cefEscapeExtension($!{Event.violations.alert.username}) src=${Event.sourceInfo.sourceIp} spt=${Event.sourceInfo.sourcePort} proto=${Event.sourceInfo.ipProtocol} rt=#arcsightDate(${Event.violations.alert.createTime}) cat=Alert cs1=#cefEscapeExtension($!{Event.violations.alert.serverGroupName}) cs1Label=ServerGroup cs2=#cefEscapeExtension($!{Event.violations.alert.serviceName}) cs2Label=ServiceName cs3=#cefEscapeExtension($!{Event.violations.alert.applicationName}) cs3Label=ApplicationName deviceExternalId=$!{Event.gateway} cs4=$!{Event.struct.mxIp} cs4Label=MxIP cs5="thr-services"\="$!{Violation.Threatradar.Service}","simulation-mode"\="$!{Event.violations.alert.simulationMode}","client-type"\="#cefEscapeExtension($!{Event.struct.botClassification.clientType})","bot-classification"\="#cefEscapeExtension($!{Event.struct.botClassification.botType})","is-soap"\="$!{Event.struct.soap}","soap-action"\="#cefEscapeExtension($!{Event.struct.httpRequest.soapAction.soapAction})" cs5Label=AdditionalInfo externalId=$!{Violation.Id} reason=#cefEscapeExtension($!{Event.violations.alert.alertMetadata.alertName}) requestMethod=#cefEscapeExtension($!{Request.Http.Method}) flexString2Label=HttpInfo flexString2="response-size"\="$!{Response.Http.Size}","response-time"\="$!{Response.Http.Time}","response-code"\="$!{Response.Http.Code}","http-version"\="$!{Request.Http.Version}","session-id"\="$!{Request.Http.SessionId}" cs6Label=ViolationAttributes cs6=#cefEscapeExtension(${Violation.AttributesList}) request=http://#cefEscapeExtension($!{Request.Http.Host})#cefEscapeExtension($!{Request.Http.UrlFullPath})?#cefEscapeExtension($!{Request.Http.UrlQueryString}) requestClientApplication=#cefEscapeExtension($!{Event.UserAgent}) flexString1Label=RequestParameters flexString1=#cefEscapeExtension($!{Request.Http.ParameterList}) requestContext=#cefEscapeExtension($!{Request.Http.HeaderList}) requestCookies=#cefEscapeExtension($!{Request.Http.CookieList})
f. Facility can be whatever you want. The default is “USER”.
3. Click the blue “Save” icon in the upper right corner of the screen to save your new Action Interface.
Create the Action Set
The next step is to create the Action Set you will apply to the security policies you wish to send to the Azure Sentinel service you have created. This is accomplished by navigating to Main -> Policies -> Action Sets.
1. First, create a new Action Set by clicking the red “Plus” sign in the upper left part of the screen.
Name it something that will make it easy to understand what it is for and select “Security Violations - All” from the pull-down menu.2. Now highlight the newly created Action Set on the left side of the screen, and in the middle portion of the screen, send the Action Interface you created in the previous step, up to the top by clicking the green arrow next to it.
3. You need to type something into the Name field so give it a name that makes sense to you and is easy to understand what it does.
4. Click the blue “Save” icon in the upper right portion of the screen to save the newly created Action Set.
Add the Action Set to a Security Policy
The final step is to add the newly created Action Set to the security policies you wish to send to the Azure Sentinel service you have created.
1. First select the security policy you wish to have alerts sent to Azure
Under the Followed Action option. Select the newly created Action Set.2. Click the blue “Save” icon in the upper right of the screen to save the new policy options.
3. Repeat for each policy you wish to have alerts sent for.
Check the Azure Sentinel service
You should now be able to check the Azure Sentinel service you created and start seeing alerts populate the dashboards.
Related content:
Imperva WAF Gateway (previously SecureSphere) Common Questions
WAF Gateway (previously SecureSphere) 2020 Roadmap Q&A
#On-PremisesWAF(formerlySecuresphere)